Design Inspiration
When it comes to laying a patio area in your garden, many people choose a regular grid of square or rectangular slabs, all the same size and colour. It’s surprisingly easy to create a practical yet beautiful space by playing with different textures, colours and laying patterns. Here are some simple yet creative ideas to inspire you and help you design your perfect space.
Stack bond is the simplest and most common way to lay a patio. Coordinate your grout colour for a seamless look, or use a contrasting colour to add a simple statement.
Third bond is a great way to lay planks and larger tiles for a contemporary look. Staggering the tiles in this way creates an organic feel and helps to define the shape of the tiles.
You can create an interesting twist on a simple pattern with the diamond layout - perfect for square tiles.
Using a random stagger is a great way to create a natural look and the herringbone pattern is a good way to create a sense of space in small areas - both of these layouts work especially well for planks.
Some of our Al Fresco collection features both square and rectangle tiles in the same design and colour - you can mix these together in rows to create a modular-style effect which is really effective in larger spaces.
Larger porcelain tiles inherently have a slight curvature to them, which means that fixing them in a brick bond layout can make the floor appear slightly uneven. Although we don’t recommend it, if you try laying your tiles in a brick bond pattern and you’re happy with the level of evenness between each row of tiles then there’s no reason why you can’t lay them in this way.

Installation Advice
With the right materials and preparation, you can easily install your own Al Fresco tiles. Follow these simple steps to create your own seamless indoor & outdoor space!
If you’re looking for advice on how to lay 20mm Porcelain tiles, you’ve come to the right place! We’ve put together a step-by-step guide to show you all the best practices when preparing, laying, cutting, installing & maintaining your Al Fresco outdoor porcelain tiles. Hit play on the video on the right to see how it’s done, or check below for a detailed guide!
If you’re a little stuck or not sure of anything shown in this installation guide, head to our contact us page to get in touch with a member of our team who’ll be happy to help.
How to install a porcelain patio on wet mortar

Step One
Firstly, mark out the area where you want your patio to be with posts and string. Measure the length and width of your area and multiply these values together to calculate the square meterage. If your area is not a straightforward square or rectangle, break each area down into smaller rectangles. Calculate each rectangle, then add these values together. Once you’ve calculated the total square meterage, multiply this number by 1.1. This adds 10% extra on to your total to allow for cuts and wastage.

Step Two
Although outdoor porcelain tiles don’t need to be sealed to protect them from water penetration, you may find the installation process easier if you coat the tiles before installation with Al Fresco Tile Protector. This prevents mortar and slurry from becoming ingrained in the surface of the tiles and makes cleaning up after installation even easier. Apply to the surface of the tile with a foam roller, taking care not to coat the edges as this can prevent the grout from bonding.

Step Three
Before you lay your tiles, you will need to prepare the ground, by digging to a depth of around 150-200mm. Your ground should have a slight slope to allow for drainage. If you’re tiling up to the edge of a house or wall, the slope should run away from the structure.

Step Five
Add a layer of mortar on top of the compressed hardcore. We recommend 4 parts sand to 1 part cement.
Step Seven
Place the tile into position, using a corner as a starting point - for example next to a wall or house. Press into place and use a rubber mallet and spirit level to secure and adjust the level, remembering to take drainage into consideration. Continue to lay tiles in this way leaving a minimum 3mm gap between each one. Use a bucket of water and sponge to clean up any mortar or slurry as you go.

Step Four
Fill with hardcore (gravel and crushed hard rock) to a depth of 100-150mm and use a rake to distribute the mixture. Compress the hardcore using a whacker power plate, building up in layers. Remember to check that your ground still has a slight slope.

Step Six
Place 7 litres of clean water in a suitable container. Add UltraScape Pro-Prime powder slowly and mix for 3 to 5 minutes to create a smooth lump-free slurry. Coat the underside of the first tile with priming slurry. Using priming slurry is an essential step to ensure that your tiles bond to the mortar bed.

Step Eight
Avoid walking on your newly laid patio for a minimum of 24-48 hours to allow it to dry and strengthen. If you wish to infill any joint gaps, we recommend using ProPave Brush-In Grout designed for outdoor porcelain tiles. Use a brush to mix over the joints, gradually and evenly filling them all in. Once the joints are filled, use a pointing trowel to firm the grout into place. Add more grout if needed to create a clean and level finish.
How to create a raised patio with pedestals

Step One
Pedestals are a great way to create a patio area without the need for lots of messy equipment or tools. They can be laid on top of any solid surface such as existing patios, tarmac driveways or even balconies. It’s a good idea to place a layer of weed membrane down under the pedestals so that you don’t get weeds growing up through the gaps. If your sub-surface is completely solid such as a concrete slab or balcony, you can skip this step. If you don’t already have a solid sub-base, you will need to create one before you begin installation.

Step Two
Before you begin, you will need to calculate how many pedestals you need. The easiest way to do this, is to measure and sketch out your patio plans. The spacer tabs in the top of the pedestal head hold up to four tile corners in place. For the edges, you will need to remove two of the spacer tabs, and for corners you will need to remove all of the spacer tabs so that the tile sits flush on top. For larger tiles you may wish to place an additional pedestal without spacer tabs in the centre for extra support.


Step Three
Prepare your pedestals for the edges and corners. For the edges, cut along the base line to remove one side. For the corners, cut along an additional base line to remove two sides and create a right angle. To remove the tabs, simply snap and pull with your fingers or pliers.

Step Five
Continue to lay your tiles, adjusting the height and level as you go by inserting the adjustment key between the tile joints and twisting. Once the whole pedestal patio area is complete, review the level again and adjust if needed.

Step Four
Use a corner as a starting point such as next to a wall, house or fence, and place the first pedestal. Place three more pedestals in a grid layout to fit the measurements of your tile. Twist the pedestal by hand or with the adjustment key to alter the height. Align the pedestal head so that the cross shaped keyhole is at a right angle to the tile corner. Place the tile on top of the pedestals ensuring that the corners sit flush into the tabs.

Step Six
If you need to create a step front, measure and cut your tile to the correct height. Temporarily remove any tiles from the main patio area that lay on top of an edge or corner and prepare the edging clips by laying one piece underneath the pedestal, and one piece on top. The top piece should slot on top of the spacer tabs.

Step Seven
Place the cut tile piece in between the clips to hold it in place. If you wish, you can secure the edging clips with silicone or glue but this is not essential. Repeat this process for the corner clips until your step front is completed.
Step Eight
Place your tiles back in place on top of the pedestals to complete the look.
How to cut outdoor porcelain tiles


Step One
Outdoor porcelain tiles are super strong and cannot be cut using traditional hand tools. In order to minimise breakages and spoiled cuts, we recommend using a water fed cutter with a diamond blade. This will also help to minimise dust. Always wear gloves, safety footwear, goggles & respiratory protection when using cutting equipment. Handle your tiles with care to avoid breakages and seek assistance when lifting.
Step Two
Measure and mark a line where you would like to cut the tile. Cut from the top surface with the blade running at half-revs. Bring the blade into contact with the tile. As the blade bites the tile, increase the revs if necessary and progress along the marked line. Ensure the blade is water fed throughout and remains evenly balanced. Do not attempt to plunge the blade through the tile in one go - progress steadily and repeat the process until the tile is cut.
Different options for step edges


Option One
Simply lay one tile on top of the other. This is a simple method that does not require any additional materials, however one edge of the tile will be exposed.
Option Two
Mitre the edges at 45 degrees so both tile edges are hidden at the joint. This process is more labour intensive but creates a premium finish.
Option Three
Disguise the tile edges by creating a border with timber sleepers. This is a good technique to coordinate with timber raised beds around borders.
How to lay stepping stones or staggered patios


Step One
Before you begin, arrange the tiles in your desired layout. A gap of 50-100mm is recommended between each tile. Mark around the edges of the tile with a spade, remove the tile and dig down approximately 60mm in depth. Add a layer of 4mm gravel to fill to a depth of 30mm, followed by a layer of sharp sand to raise the level to 40mm.
Step Two
Position the tile on top and adjust the level with a rubber mallet until the surface is flat. Adjust the depth of the gravel and sand as required to achieve a flush and level finish. If you are creating a gravel border, you should raise the gravel and sand level so that the tile sits approximately 10mm above ground level. Arrange your gravel around the tile edges for an attractive finish.
Aftercare

Clean & Protect
Maintaining your porcelain tiles is easy, simply sweep away any loose dirt regularly, and brush with warm soapy water for an extra clean as and when needed. Outdoor porcelain tiles do not require sealing, however you may wish to apply Al Fresco Tile Protector after grouting to protect your tiles against the dirt of everyday living.

Stains & Residues
For any mild stains and residues, dilute 1 part Al Fresco Residue Remover in 4 parts water. Dampen a cloth or sponge and wipe thoroughly. For tougher stains and residues, dilute 1 part Al Fresco Residue Remover with 1 part water. Apply liberally over the surface of the tile and agitate with a scrubbing brush. Leave for 5-10 minutes before rinsing with clean water. For extremely stubborn stains, use undiluted Residue Remover and agitate with a scrubbing brush. Always rinse the surface with clean water afterwards.
How to lay single tiles


Create pathways and patterns by loose laying Al Fresco tiles on to grass or gravel.
-
Place the tiles on the ground in the desired pattern. Measure around the tile and mark the area with posts and string.
-
Remove the tile from the ground and dig down 150mm.
-
Compact the bottom and walls of the well and line with a water proof membrane.
-
Fill the well with gravel until it is 20mm from the top. This will allow for drainage.
-
Ensure the gravel is sturdy and level then place your tile on top.
How to lay a patio


Al Fresco tiles are a great alternative to traditional stone, paving or decking. See our easy guide below for how to install a
traditional patio.
-
Mark out the area with posts and string.
-
Measure the length and width and multiply these values together to calculate the square meterage and how
many tiles you will need.
-
Dig down 150-200mm to allow for foundations. The ground should have a slight slope to allow for drainage. Fill with hardcore (gravel and crushed hard rock) to a depth of 100-150mm and use a rake to distribute the mixture. Compress the hardcore using a whacker power plate, building up in layers.
-
Add a layer of mortar on top of the compressed hardcore. We recommend 4 parts sand to 1 part cement.
-
Apply a layer of priming slurry on top of the mortar.
-
Coat the underside of the first tile with priming slurry.
-
Place the tile into position using a corner as a starting point, eg. next to a wall or house
-
Press into place and use a rubber mallet to secure and adjust the level.
-
Continue to lay tiles in this way leaving a 2-3mm joint gap. Use a bucket and sponge to clean up any mortar or slurry as you go.
-
Once complete, leave to dry for at least 24 hours. If wet weather is forecast, cover the area with a plastic sheet.
-
If you wish to infill any joint gaps, use the same mix of mortar as before and use a brush to mix over the joints, gradually and evenly filling them all in.
-
Once the joints are filled, use a pointing trowel to firm the mortar into place. Add more mortar mix if needed to create a clean and level area.
-
Alternatively, instead of mortar mix you can use kiln-dried sand. Spread the mix on the area and brush it into the joints. You may need to repeat this process a few days later once the sand has settled.
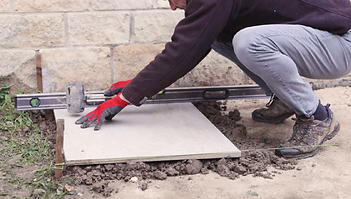
How to cut indoor porcelain tiles

Indoor spaces often pose many more obstacles than outdoor spaces. Here’s a quick guide on how to cut indoor tiles to different shapes and sizes.
-
Measure where the tile needs to be cut
-
If you have a manual tile cutter, place the tile in the cutter and square up to the plate.
-
Press down hard on the cutter and push forwards to score a line.
-
Some cutters will automatically snap the tile as you push down to score it. If your cutter doesn’t, apply pressure to both sides of the tile to snap it into two pieces.
-
Use a file to smooth the edges if needed.
-
If you need to cut a curve or a shape, use tile nippers to nibble the tile away until you achieve the desired shape.
-
You can also use an electric cutter in a similar technique as described for our outdoor Al Fresco tiles.
Important Information
Dimensions
We manufacture our tiles to extremely tight tolerances, however, due to the nature of the manufacturing process, sizes, weights, capacities, dimensions and measurements indicated may vary slightly. Tile sizes are Nominal. Nominal sizes are “family sizes” i.e. 600x600mm, 600x900mm. Similar to a 2x4” length of timber - when measured this would not measure exactly 2x4” size and may differ a few mm each way. Work size is the actual size of the tiles after production. This is indicated on the product packaging (W).